Chocolate Strawberry Oasis Pie

Cocoa comes from a tree which means its healthy.

Fun Fact: According to the USDA, Americans eat about 3.4 lbs. of fresh strawberries every year.

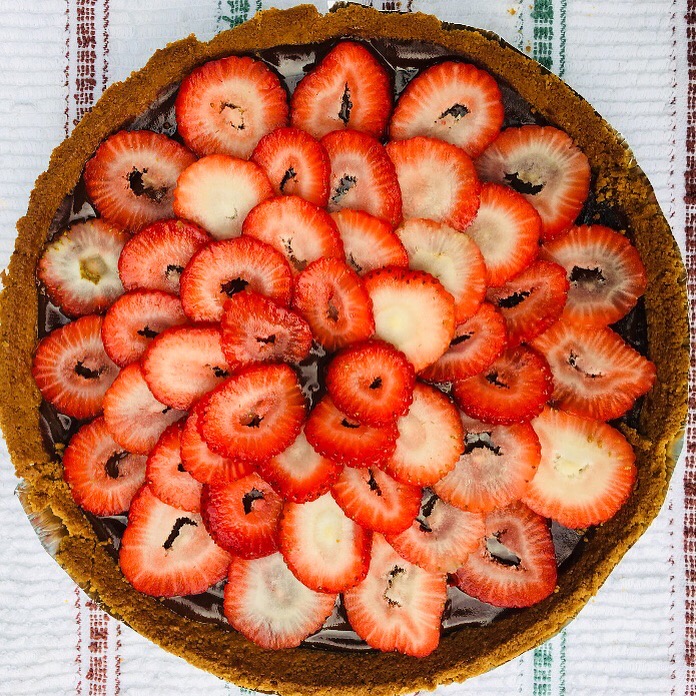
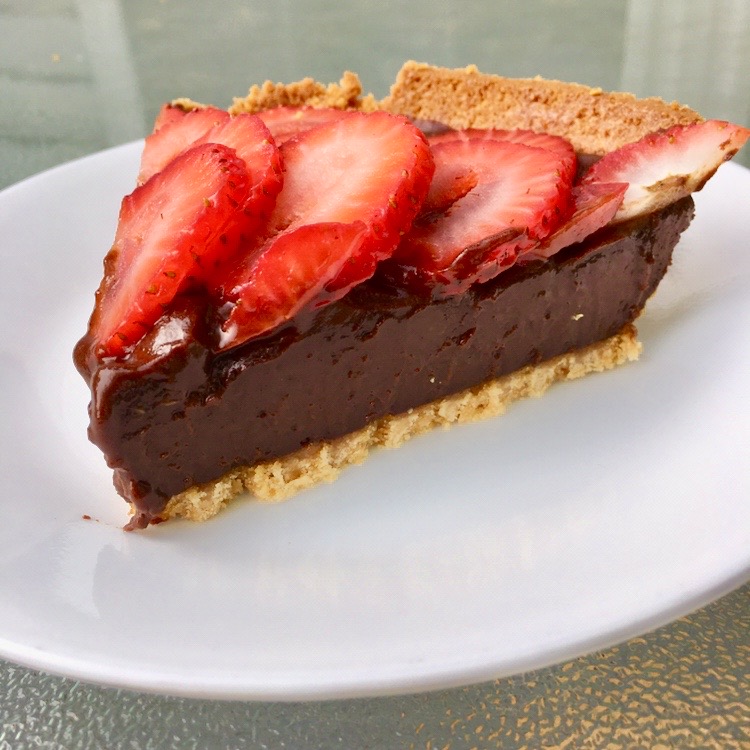
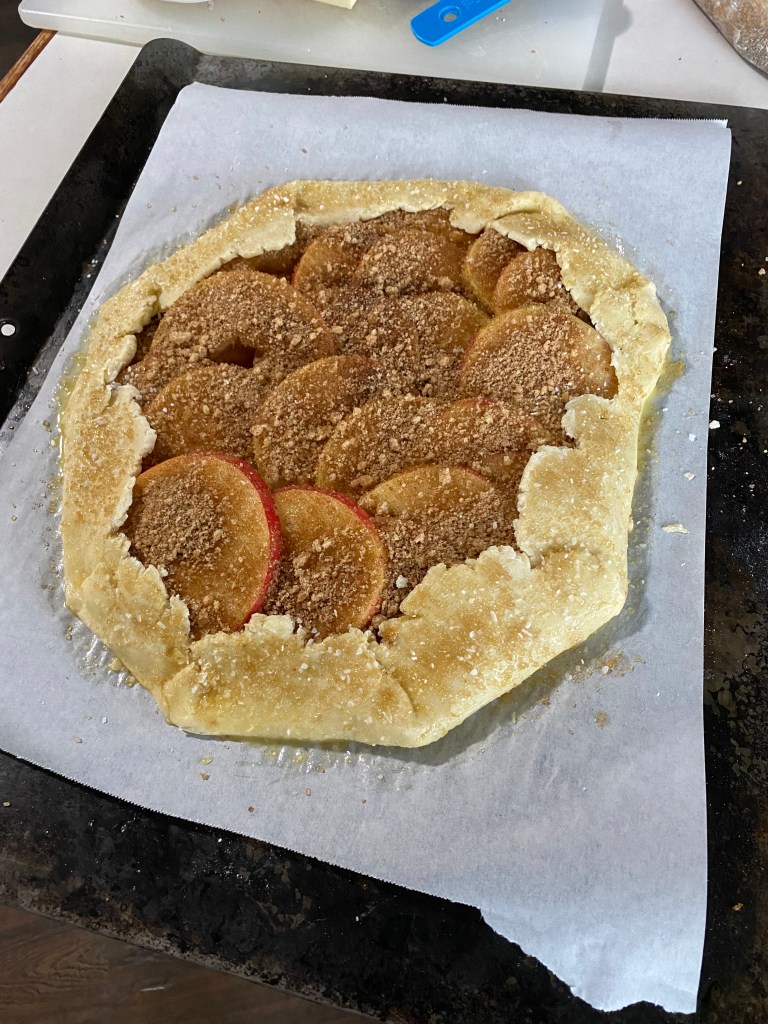
This is a pretty simple dish but with proper presentation can look stunning and be a great desert for Mother’s Day or really any other day you want to eat a pie. You do you. It would be cool to mix this up and use different berries as toppings as well to add some extra flavor and color to the dish.

This recipe is from Binging with Babish (click here) and I stayed pretty closely to the recipe. He makes his own crust, but to save on time or simplify things you can even use a store-made graham cracker crust. I used one for the pictures you see above. Don’t worry, I won’t tell if you do.

Apple Galette

Because Apple Galette sounds much fancier than Apple Pie.


Fun Fact: According to common consensus, Apple Pie was actually invented in England over 600 years ago.

I’ve recently started to make an effort to bake more and this works great especially around the holidays since baked goods is basically its own food group. While looking for something new I decided to make this galette as an alternative to pie and now I am on the galette bandwagon.

Compared to a traditional pie, this has a much better crust to filling ratio and is light enough to not overload you after a great meal. Plus saying that you ‘made a galette’ sounds much fancier than making a boring ol’ apple pie.

I used Alison Roman’s recipe for both the crust (click here) and the filling (click here) and it was super easy to make in the morning before the other main dishes. To help save time, feel free to make the dough the day before and keep in the fridge. I think the next time I make this, I may try to whip up a simple oat crumble on top to give some extra texture.

THE Brownies

Brownies are good. ‘Nuff said.

Fun Fact: Chocolate is made from cacao which is the seed of a fruit tree so this counts for your daily fruit serving (first part true, second part questionable).

This brownie recipe is my ideal brownie – fudg-ey, chewy, chocolatey. Cake-y brownies are not invited to this party. This is one of the first recipes I developed on my own and its taken a few iterations to get to the current state and I’m always looking to improve.

Some of the key things I like about this is the ability to control the type of chocolate; I like to use a mix of dark and milk to add more depth to the flavor profile. Additionally, chopping the chocolate gives a non-uniform size and adds variety to each bite – you might get a huge pocket of melted chocolate or a few small pieces mixed together.

Tips and tricks:

  • USE parchment paper if you want your life to be easy and to make removing these brownies not a terrible time. Using parchment paper + nonstick spray is extra credit.
  • Feel free to experiment with the types and bitterness of chocolate. I always end up changing my mixes depending on how I feel and what I find. This is the one ingredient I usually splurge on (if you can) since its the dominant flavor profile. The dark chocolate (70% cocoa) really helps bring depth and avoid too much sweetness.
  • Don’t overtake these. All ovens are a bit different, and I would err on the side of under-baking than overtaking to make sure they remain chewy and fudge. The CDC says it’s okay to eat a little raw batter during mixing. (Disclosure: not actual CDC advice)

Ingredients

  • 5oz chocolate, chopped for mix-in (I use a mix of 70% cocoa and 40% cocoa)
  • 3oz chocolate, chopped (for topping)
  • 1 1/8 c. butter
  • 3/4 c. cocoa powder
  • 1.5 c. granulated sugar
  • 3/4 c. light brown sugar
  • 4 eggs + 1 egg yolk
  • 3 tsp. vanilla extract
  • 1 1/8 c. AP flour
  • 1 tsp. kosher salt
  • 1.5 c. chocolate chips or chopped chocolate for melting
  • 1.5 tsp espresso powder
  • 2 tsp molases (optional)

Get Cooking

  1. Preheat oven to 350F. Line a 13×9 metal baking dish with parchment paper and some baking spray for good luck.
  2. Heat the butter in a saucepan over medium heat until the milk solids have browned and turned a golden color. It should smell nutty, butterscotch-y, and all around really good. Once the butter is melted, remove from heat and whisk in the cocoa powder until smooth. Set aside to let cool slightly.
  3. Combine the granulated and brown sugar in a bowl and whisk to combine. When the butter has cooled slightly, whisk into the sugar mixture until fully combined. I use an electric mixer because I’m lazy but don’t beat too much air into it.
  4. In a bowl, melt ~4 oz of the chocolate chips and add that to the butter-sugar mixture. Additionally, whisk in the eggs + yolk one at a time until fully incorporated. Add in the vanilla extract, espresso powder, and molasses and beat to combine.
  5. Mix in the flour in small batches and stir with a spatula/ wooden spoon. At this point, add in the remainder of the chocolate chips and the 5 oz. of chopped chocolate. The batter should be thiccc (with at least 2-4 c’s).
  6. Pour the batter into the baking dish and spread evenly. Top the batter with the remaining 3-4 oz. chopped chocolate.
  7. Bake 30-35 minutes or until just done or slightly under-baked. (All ovens are a bit different so just keep an eye on it). To test- use a toothpick into the center that comes out without too many crumbs. There may be melted chocolate so poke a few places.
  8. Pull the pan out and let cool on a wire rack for 20-30 minutes until about room temp. (hardest part). At this point, use the parchment paper (you used it right??) to remove the brownie sheet and let cool even more to allow to solidify. Make sure its completely cool before cutting.